

If you want your dash cam to work seamlessly every time you start your car, hardwiring it is the best way to go. Imagine never worrying about dead batteries or messy cords again.
Hardwiring your dash cam keeps it powered continuously, so it records even when your car is off. You’ll learn simple steps to safely connect your dash cam to your car’s electrical system. By the end, you’ll have the confidence to install it yourself and enjoy uninterrupted protection on the road.
Ready to make your dash cam smarter and more reliable? Let’s dive in.
Preparing For Installation
Preparing for the dash cam hardwire installation is key to a smooth process. Proper preparation saves time and avoids mistakes. It ensures your dash cam receives constant power safely. Take time to gather the right supplies and tools. Understanding the power source helps prevent electrical issues. Let’s explore the essentials before starting the hardwire setup.
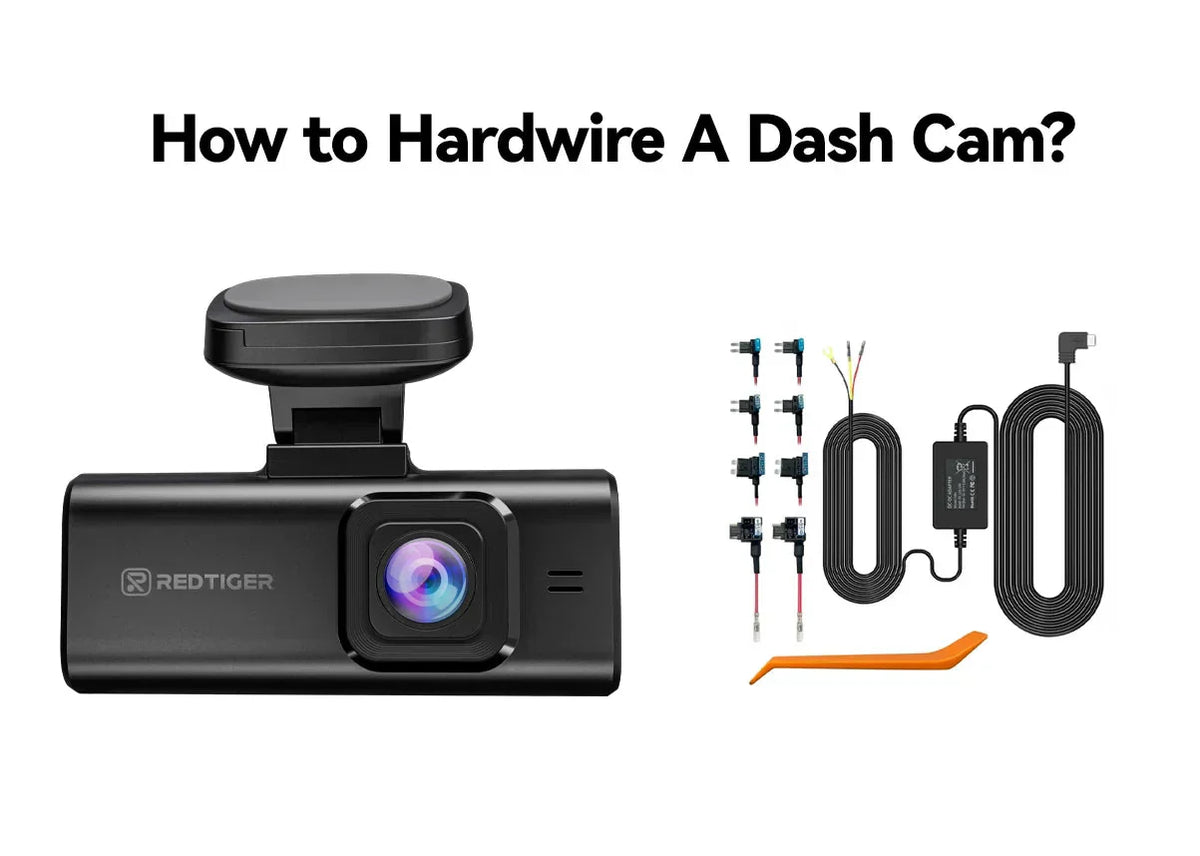
Selecting The Right Hardwire Kit
Choose a hardwire kit that fits your dash cam model. Some kits include voltage protection to guard your car battery. Look for kits with fuse taps for easy connection. Check if the kit comes with clear instructions. Quality kits reduce installation problems and improve safety.
Gathering Necessary Tools
Prepare basic tools for a hassle-free installation. Common tools include:
- Trim removal tools
- Wire strippers and crimpers
- Multimeter for testing voltage
- Electrical tape or heat shrink tubing
- Socket wrench set
Having these tools ready helps avoid interruptions during the job. Use proper tools to protect your car’s interior parts.
Choosing The Power Source
Select a power source that powers the dash cam safely and consistently. Options include:
- Fused ignition source for power only when the car runs
- Constant 12V source for continuous power
- Ground connection to complete the circuit
Use a multimeter to identify the correct wires in your fuse box. Proper power selection prevents battery drain and keeps the dash cam functional.

Credit: www.youtube.com
Step-by-step Hardwiring Process
Hardwiring a dash cam into your car ensures it gets constant power without cluttering your cigarette lighter socket. This process might seem technical at first, but breaking it down into clear steps makes it manageable. You’ll gain a clean setup that keeps your dash cam powered even when your engine is off, which is great for parking mode features.
Locating The Fuse Box
Start by finding your car’s fuse box. Most vehicles have at least two fuse boxes—one under the dashboard and another in the engine compartment. Check your owner’s manual or look for a labeled panel near the driver’s side footwell or under the hood.
Knowing the fuse box location is crucial because it houses the circuits you’ll tap into. Have you ever noticed how many gadgets in your car run off different fuses? Choosing the right fuse can make a big difference in your dash cam’s performance.
Connecting To The Fuse Tap
Use a fuse tap adapter to connect your dash cam’s power cable to the fuse box. This adapter lets you safely draw power without cutting or splicing wires. Simply remove the fuse you want to tap into, plug it into the fuse tap, then insert the tap into the slot.
Pick a fuse that provides power only when the ignition is on, like the radio or accessory fuse. This prevents your dash cam from draining the battery when the car is off. Double-check the fuse rating to avoid electrical issues—matching the amp rating is key for safety.
Routing The Wiring Neatly
Once connected, route the wiring along the car’s trim panels for a tidy look. Use plastic clips or zip ties to secure the cable and keep it away from moving parts or sharp edges. This not only protects the wiring but also keeps your car’s interior looking organized.
Think about how you enter and exit your vehicle. Avoid running cables where they could get pinched by doors or pedals. A clean install shows attention to detail and prevents future headaches with loose or damaged wires.
Testing And Final Adjustments
Testing and making final adjustments are key after hardwiring your dash cam. This stage ensures the dash cam works perfectly and stays safe in your car. Careful checks prevent future problems and improve recording quality. Follow these steps to confirm everything is set up correctly.
Powering On The Dash Cam
Start by turning on your car’s ignition. Watch the dash cam screen for signs of power. The camera should light up and begin recording automatically.
If the dash cam does not power on, check the fuse and wiring connections. Make sure the hardwire kit is properly connected to the fuse box. A working connection means the camera will turn on with the car and turn off when the car is off.
Securing Loose Wires
Loose wires can cause damage or distractions while driving. Use zip ties to bundle wires neatly and keep them away from pedals and moving parts. Tuck wires behind trim panels or under the dashboard to hide them.
Double-check that no wires interfere with airbags or door mechanisms. Secure wires firmly to avoid pulling or disconnection while driving. Clean installation looks professional and improves safety.
Troubleshooting Common Issues
- Dash cam does not turn on: Check fuse, wiring, and power source.
- Recording stops unexpectedly: Verify memory card health and storage space.
- Dash cam restarts randomly: Ensure stable power supply and tight connections.
- Screen shows error messages: Reset the dash cam or update its firmware.
- No sound or poor video quality: Clean the lens and check settings.
Address these problems early to keep your dash cam reliable. Regular checks help maintain its performance over time.

Credit: wolfbox.com
Credit: www.redtigercam.com
Frequently Asked Questions
How Do I Hardwire A Dash Cam To My Car Battery?
To hardwire a dash cam, connect the power cable to your car’s fuse box. Use a fuse tap for safe installation. Connect the ground wire to a metal part of the car frame. This setup provides constant power while protecting your car’s electrical system.
What Tools Are Needed To Hardwire A Dash Cam?
You will need a fuse tap, wire stripper, multimeter, and a screwdriver. Also, have electrical tape and zip ties for securing wires. These tools help ensure a safe and neat installation of your dash cam hardwiring kit.
Can I Hardwire A Dash Cam Without Draining My Car Battery?
Yes, use a low-voltage cutoff device or a hardwire kit with battery protection. This prevents excessive battery drain by cutting power when voltage is low. It keeps your car battery safe while allowing your dash cam to record continuously.
Where Is The Best Place To Connect Dash Cam Power?
The best place is the fuse box using an accessory fuse that powers on with ignition. This ensures the dash cam only operates when the car is running. Avoid constant power fuses unless using a battery protection feature.
Conclusion
Hardwiring a dash cam keeps it powered without clutter. It offers a neat look and constant recording. Follow safety steps to avoid car damage. Check your car’s fuse box for correct wiring. Take your time and double-check connections. This setup protects your vehicle and records clearly.
Enjoy peace of mind while driving every day. A hardwired dash cam is a smart choice. Keep your car safe with steady video evidence. Simple steps lead to a reliable dash cam install.


