

Are you ready to transform your driving experience with crystal-clear sound and booming bass? Installing an audio system in your car might seem tricky, but with the right steps, you can do it yourself and save money.
Imagine enjoying your favorite tunes with perfect clarity every time you hit the road. In this guide, you’ll discover easy-to-follow tips that make the installation process simple and stress-free. Keep reading, and by the end, you’ll have the confidence to upgrade your car’s sound system like a pro.
Preparing For Installation
Preparing for installation is a crucial stage in setting up a car audio system. It ensures a smooth and safe process. Taking time to prepare can save effort and avoid mistakes.
Gathering Tools And Materials
Collect all necessary tools before starting. Common tools include:
- Screwdrivers (flat and Phillips)
- Wire strippers
- Electrical tape
- Crimp connectors
- Multimeter
- Socket wrench set
- Panel removal tools
Also, gather materials like speaker wires, mounting brackets, and connectors. Having these ready makes the job easier and faster.
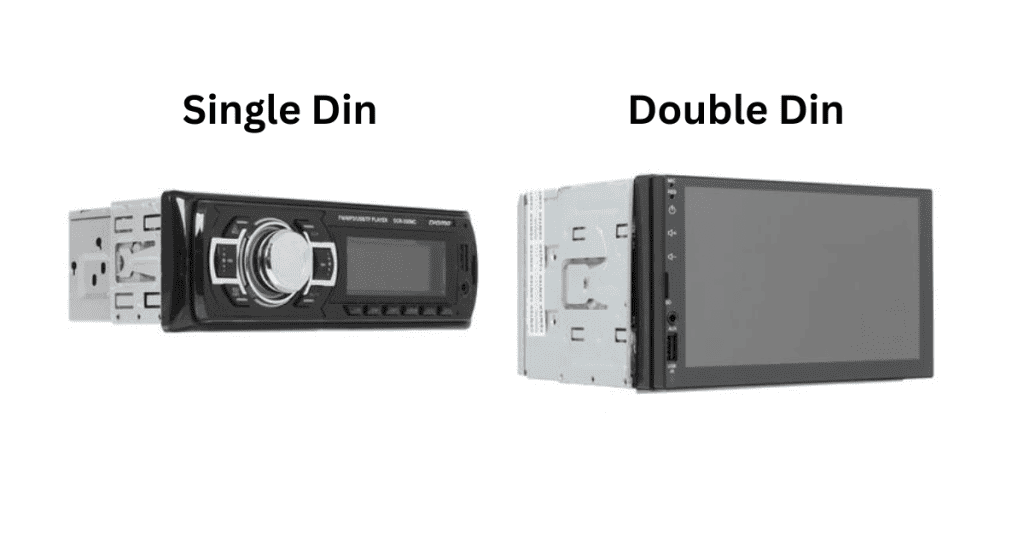
Choosing The Right Audio System
Pick an audio system that fits your car and preferences. Consider:
- Compatibility with your car model
- Sound quality and power output
- Size of speakers and subwoofers
- Ease of installation
- Budget limits
Research brands and read reviews. Select a system that balances quality and value.
Disconnecting The Car Battery
Always disconnect the car battery before installation. This prevents electrical shocks and damage. Follow these steps:
- Turn off the ignition and remove the key
- Locate the negative terminal on the battery
- Use a wrench to loosen the terminal clamp
- Remove the negative cable and secure it away from the battery
This step protects both you and your car’s electronics during installation.
Credit: www.santaclaritaautosound.com
Installing The Audio Components
Installing the audio components in your car is where the real transformation begins. This stage involves carefully removing old parts, fitting new devices, and connecting everything for optimal sound quality. Paying attention to detail here can make a big difference in how your new system performs and how long it lasts.
Removing Old Audio Equipment
Start by disconnecting your car’s battery to avoid any electrical issues. Use the right tools to gently pry out the existing head unit and speakers without damaging the dashboard or panels. Keep track of screws and connectors—you’ll need them for the new installation.
Have you noticed how some older setups hide wiring behind layers of trim? Take your time peeling back these layers carefully. Rushing can lead to broken clips or frayed wires, which will complicate your new installation.
Mounting The Head Unit
After removing the old unit, test fit the new head unit in its place. Ensure it aligns perfectly with your dashboard’s opening. If your new unit is larger or smaller, consider using a mounting kit designed for your car model.
Securing the head unit firmly prevents vibrations and rattling sounds during your drive. Use screws and brackets supplied with your kit, and double-check the fit before moving on. Have you thought about the angle of the unit? Positioning it for easy reach can enhance your driving experience.
Wiring The Speakers And Amplifier
Start by running speaker wires from the head unit to each speaker location. Match wire colors carefully—this reduces confusion and ensures proper polarity. Use connectors designed for automotive audio to maintain solid, corrosion-resistant connections.
Installing the amplifier requires extra attention to power and ground wires. Run a dedicated power cable directly from the battery with an inline fuse to protect your system. Ground the amplifier to a clean, unpainted metal surface close to the unit.
Have you planned your wire routes to avoid heat sources and moving parts? Securing wires with zip ties keeps everything tidy and prevents damage. The clearer your wiring layout, the easier future upgrades or repairs will be.
Testing And Final Adjustments
Testing and making final adjustments are essential to ensure your car audio system works perfectly. This phase confirms that all components function as expected and sound quality meets your needs. Careful checks prevent future issues and improve your listening experience.
Reconnecting The Battery
Reconnect the car battery carefully to avoid sparks. Ensure the connections are tight and secure. This step restores power to the audio system and the car’s electrical components. Double-check the battery terminals for any corrosion or loose wires before reconnecting.
Testing Sound Quality
Turn on the audio system and play different music tracks. Listen for clear sound without distortion or static noise. Test all speakers individually to confirm proper output. Adjust the volume and equalizer settings for balanced sound. Make sure bass, midrange, and treble are well-tuned for your preferences.
Securing Wires And Reassembling Panels
Organize and secure all wires using cable ties or clips. Avoid loose cables that may cause noise or damage. Carefully reinstall any panels or trim pieces removed during installation. Ensure all clips and screws fit tightly to maintain the car’s interior look. Finalize with a clean and neat setup.

Credit: www.youtube.com

Credit: www.youtube.com
Frequently Asked Questions
What Tools Are Needed To Install A Car Audio System?
You need screwdrivers, wire strippers, a drill, crimp connectors, and a multimeter. These tools help secure and connect components safely.
How Do I Choose The Right Audio System For My Car?
Consider your budget, vehicle size, and sound preferences. Look for compatible speakers, amplifiers, and head units that fit your car.
Can I Install A Car Audio System Myself?
Yes, with basic mechanical skills and proper tools, DIY installation is possible. Follow instructions carefully to avoid damage or poor sound quality.
How Long Does It Take To Install A Car Audio System?
Installation usually takes 1 to 3 hours, depending on system complexity and experience. Complex setups may require professional help for best results.
Conclusion
Installing a car audio system can be simple and fun. Follow each step with care and patience. Double-check all connections for safety and sound quality. Choose parts that fit your car and needs well. Enjoy clear and powerful music on every drive.
Taking time to do it right pays off. Your car will sound better and feel more enjoyable. Keep tools and instructions nearby for future upgrades. This guide helps you build a great audio setup easily. Now, start your installation and enjoy the music!


