

Wiring tail lights on your car might seem tricky at first, but with the right steps, you can do it yourself and save time and money. Imagine driving at night with bright, fully working tail lights that keep you safe and legal.
This guide will walk you through each step clearly and simply, so you won’t feel lost or overwhelmed. By the end, you’ll have the confidence to handle your car’s tail light wiring like a pro. Ready to get started? Let’s dive in!
Gather Tools And Materials
Gathering the right tools and materials is key to wiring tail lights properly. It makes the job easier and safer. Having everything ready saves time and avoids frustration. This section covers the essential tools, how to pick the right tail lights, and safety gear you need. Prepare well before starting to ensure success.
Essential Wiring Tools
Good tools help you work fast and clean. Basic tools include:
- Wire strippers for removing insulation
- Crimping tool to secure connectors
- Multimeter to test electrical connections
- Screwdrivers for mounting parts
- Electrical tape for insulation
- Heat shrink tubing to protect wires
- Wire connectors or butt connectors
These tools ensure safe and solid wiring connections.
Choosing The Right Tail Lights
Pick tail lights that fit your car’s make and model. Check compatibility to avoid installation issues. Consider light type:
- LED lights last longer and use less power
- Incandescent bulbs are cheaper but less efficient
Also, ensure the tail lights meet local road safety standards. Good fit and quality improve performance and safety.
Safety Gear Preparation
Safety is important during wiring work. Wear protective gear like:
- Insulated gloves to prevent electric shock
- Safety glasses to protect eyes from sparks
- Long sleeves to avoid cuts and burns
Turn off the car battery before starting. Keep a fire extinguisher nearby for emergencies. Safe preparation reduces risks and keeps you protected.
Credit: tventuring.com
Prepare The Wiring Setup
Preparing the wiring setup is an important part of wiring tail lights on a car. This step ensures all connections are correct and safe. Proper preparation helps avoid electrical problems later. Take time to organize and check all wires before starting the connection process.
Locate Existing Wiring
Begin by finding the car’s current wiring for the tail lights. Look behind the tail light assembly or inside the trunk area. Use a flashlight to spot wires running to the light sockets. Check for any damaged or worn wires that may need replacement.
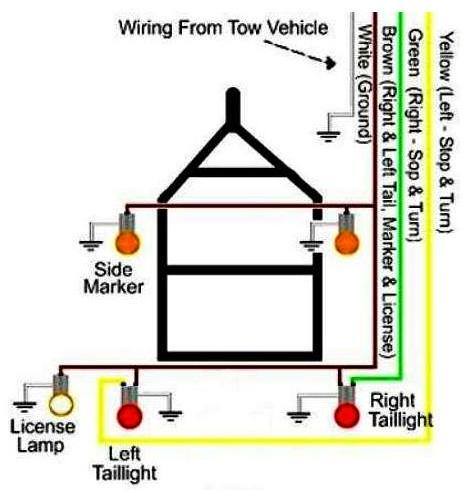
Identify Wire Functions
Next, determine the purpose of each wire you found. Tail light wiring usually includes brake light, turn signal, ground, and running light wires. Use a wiring diagram for your car model if available. Testing wires with a multimeter helps confirm their function.
Strip And Connect Wires
Strip about half an inch of insulation from the ends of the wires. Use a wire stripper for a clean cut without damaging the wire strands. Twist the exposed wire ends together to prepare for connection. Secure connections with wire connectors or solder and cover with electrical tape for safety.
Test And Secure Connections
After wiring your tail lights, testing and securing the connections is crucial. This step ensures your lights function properly and stay reliable over time. Neglecting it could lead to flickering lights or even electrical shorts.
Check Light Functions
Turn on your car’s ignition and activate the tail lights, brake lights, and turn signals. Watch each light closely to confirm they illuminate as expected. If any light is dim or unresponsive, it might signal a wiring or bulb issue.
Try pressing the brake pedal while someone watches the brake lights. Then, test the turn signals on both sides. Testing in daylight can help spot dim lights you might miss in the dark.
Fix Loose Connections
Loose connections are a common cause of intermittent lighting problems. Wiggle the wires gently around each connector while the lights are on. If the lights flicker or cut out, tighten or replace the connectors.
Use a multimeter to check continuity if you’re unsure. Secure any exposed wires with electrical tape or heat shrink tubing to prevent shorts. Have you ever driven with a flickering brake light? It’s not only unsafe but also frustrating.
Seal And Protect Wiring
Protecting your wiring extends the lifespan of your tail lights. Apply dielectric grease on connectors to keep moisture out and prevent corrosion. Wrap wires in weatherproof tape or use split loom tubing for added protection.
Make sure your wires are fastened away from hot engine parts or sharp edges using zip ties. This prevents damage from heat or abrasion, which can cause future failures. How much could you save by avoiding expensive repairs with this simple step?

Credit: www.reddit.com
Credit: www.elcaminocentral.com
Frequently Asked Questions
How Do I Connect Tail Light Wires Correctly?
To connect tail light wires, match wire colors from the car to the light. Use connectors or solder for secure joins. Always ground the tail light wire to the car chassis for proper function and avoid short circuits.
What Tools Are Needed For Wiring Tail Lights?
You need wire strippers, electrical tape, connectors, a multimeter, and screwdrivers. These tools help strip wires, test circuits, and secure connections safely and efficiently.
Can I Wire Tail Lights Without A Wiring Diagram?
It’s not recommended. A wiring diagram ensures you connect the correct wires and avoid damaging the electrical system. Always consult your car’s manual or a wiring diagram for accuracy.
How Do I Test Tail Light Wiring After Installation?
Use a multimeter or test light to check voltage at the tail light connector. Turn on the car’s lights and verify proper power flow. Ensure all connections are secure and lights illuminate correctly.
Conclusion
Wiring tail lights on a car can seem tricky at first. Step-by-step guidance makes the process clear and simple. Always check connections twice to avoid problems later. Use the right tools and follow safety tips carefully. Working patiently helps ensure the lights work perfectly.
Properly wired tail lights keep you safe on the road. Take your time, and don’t rush the job. Soon, your car’s tail lights will shine bright and steady.


